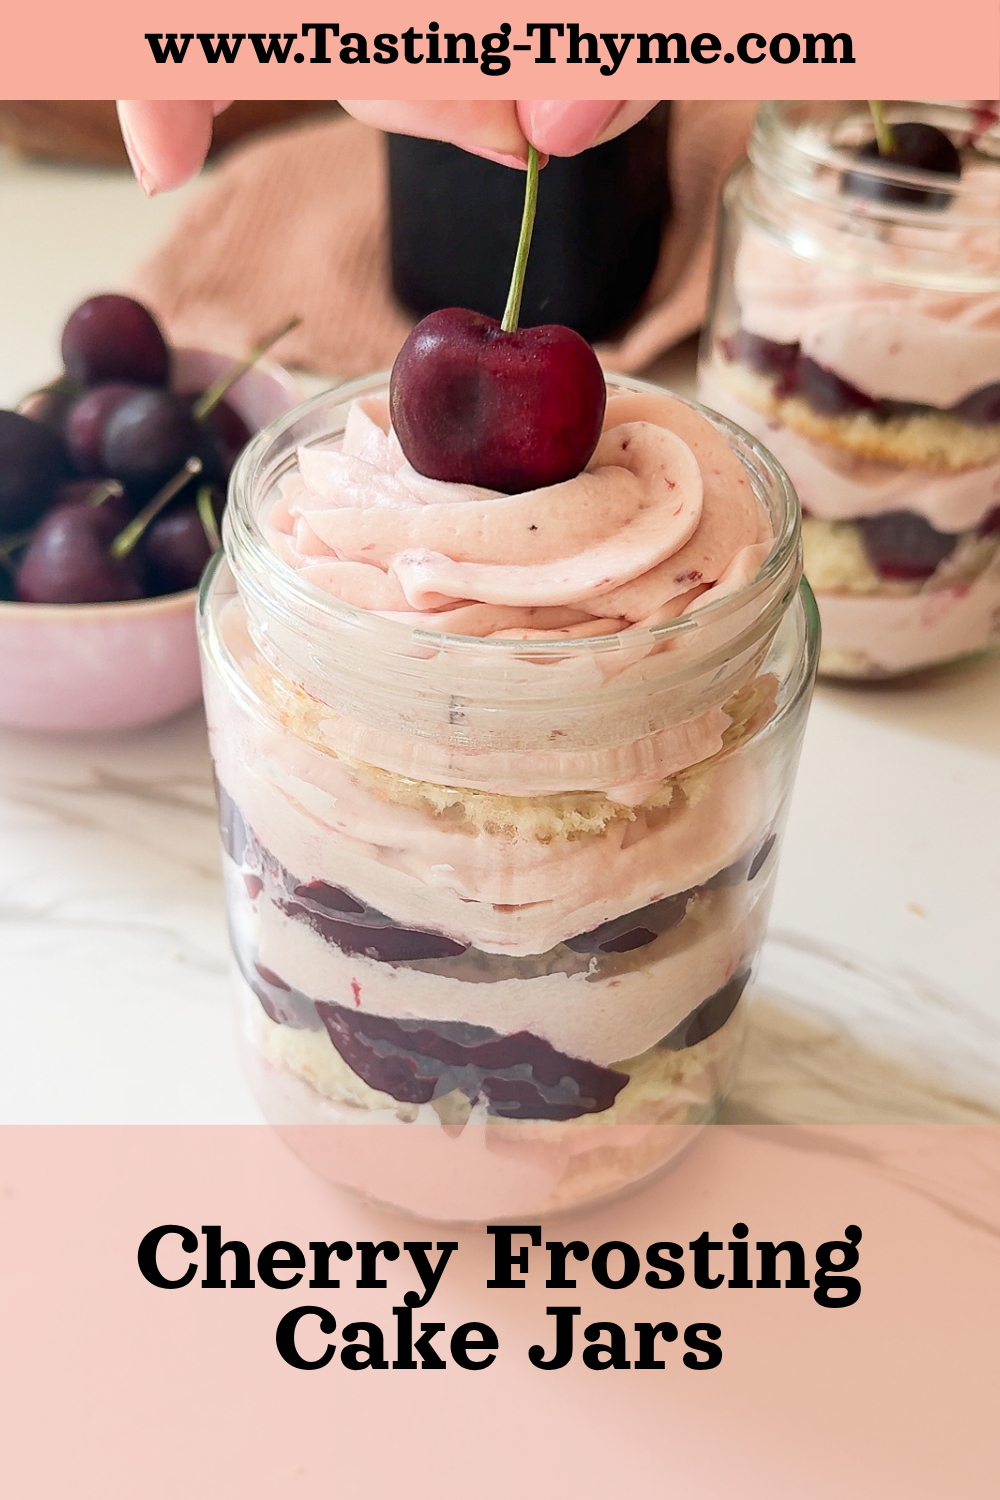
These Cherry Frosting Cake Jars have to be my new favorite way to eat cake! Perfectly portioned for an individual (okay, they’re kinda large, but who actually wants a small slice of cake), these are such a cute way to make cake for guests, for picnics, for beach days or date nights! Think layers of vanilla cake, cherry syrup and cherry buttercream frosting for the best Summery cake bite! The cake jars make use of my Easy Homemade Cherry Syrup, but in the recipe I’ll lay out some options if you don’t feel like making syrup!
Layering up vanilla cake, cherry syrup and cherry buttercream frosting means that you get all the perfect ratios that I think layer cakes can sometimes miss. No more bites of cake without frosting plus a little zing from the cherry syrup. By layering in these jars, we also are able to keep everything super moist, meaning these can be prepped ahead of time!
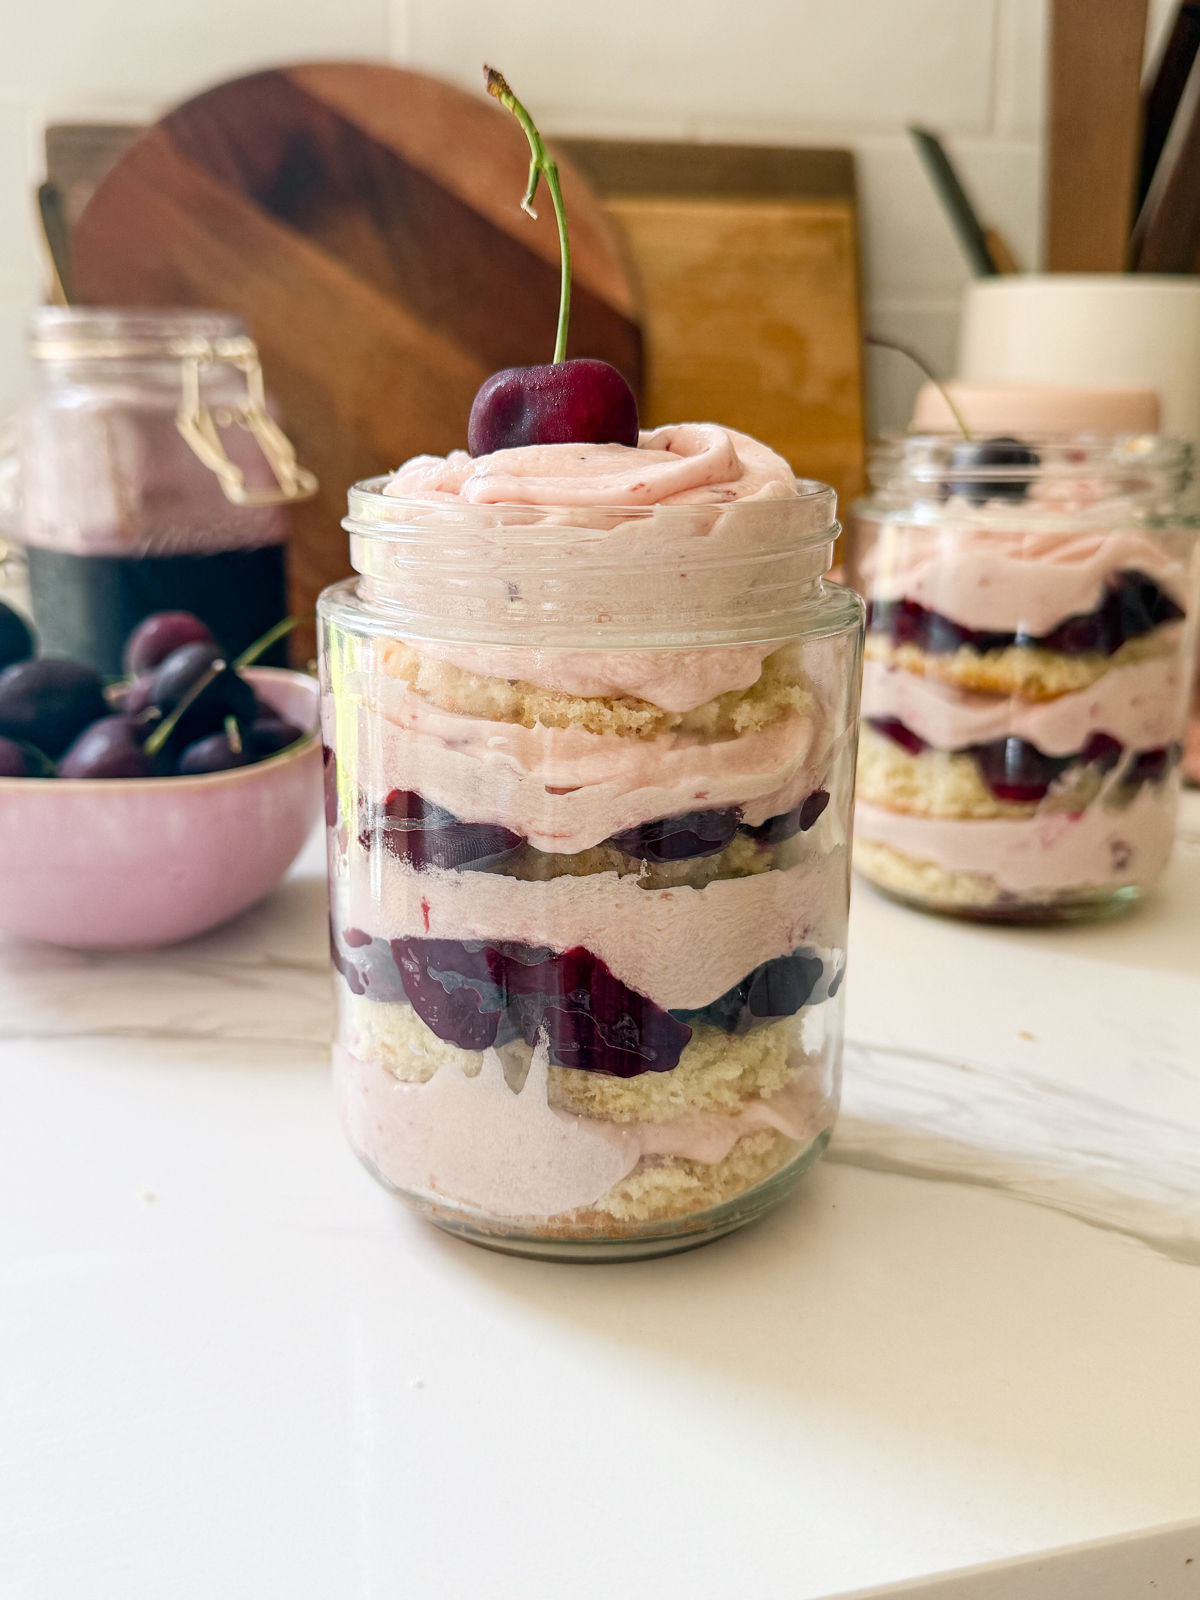
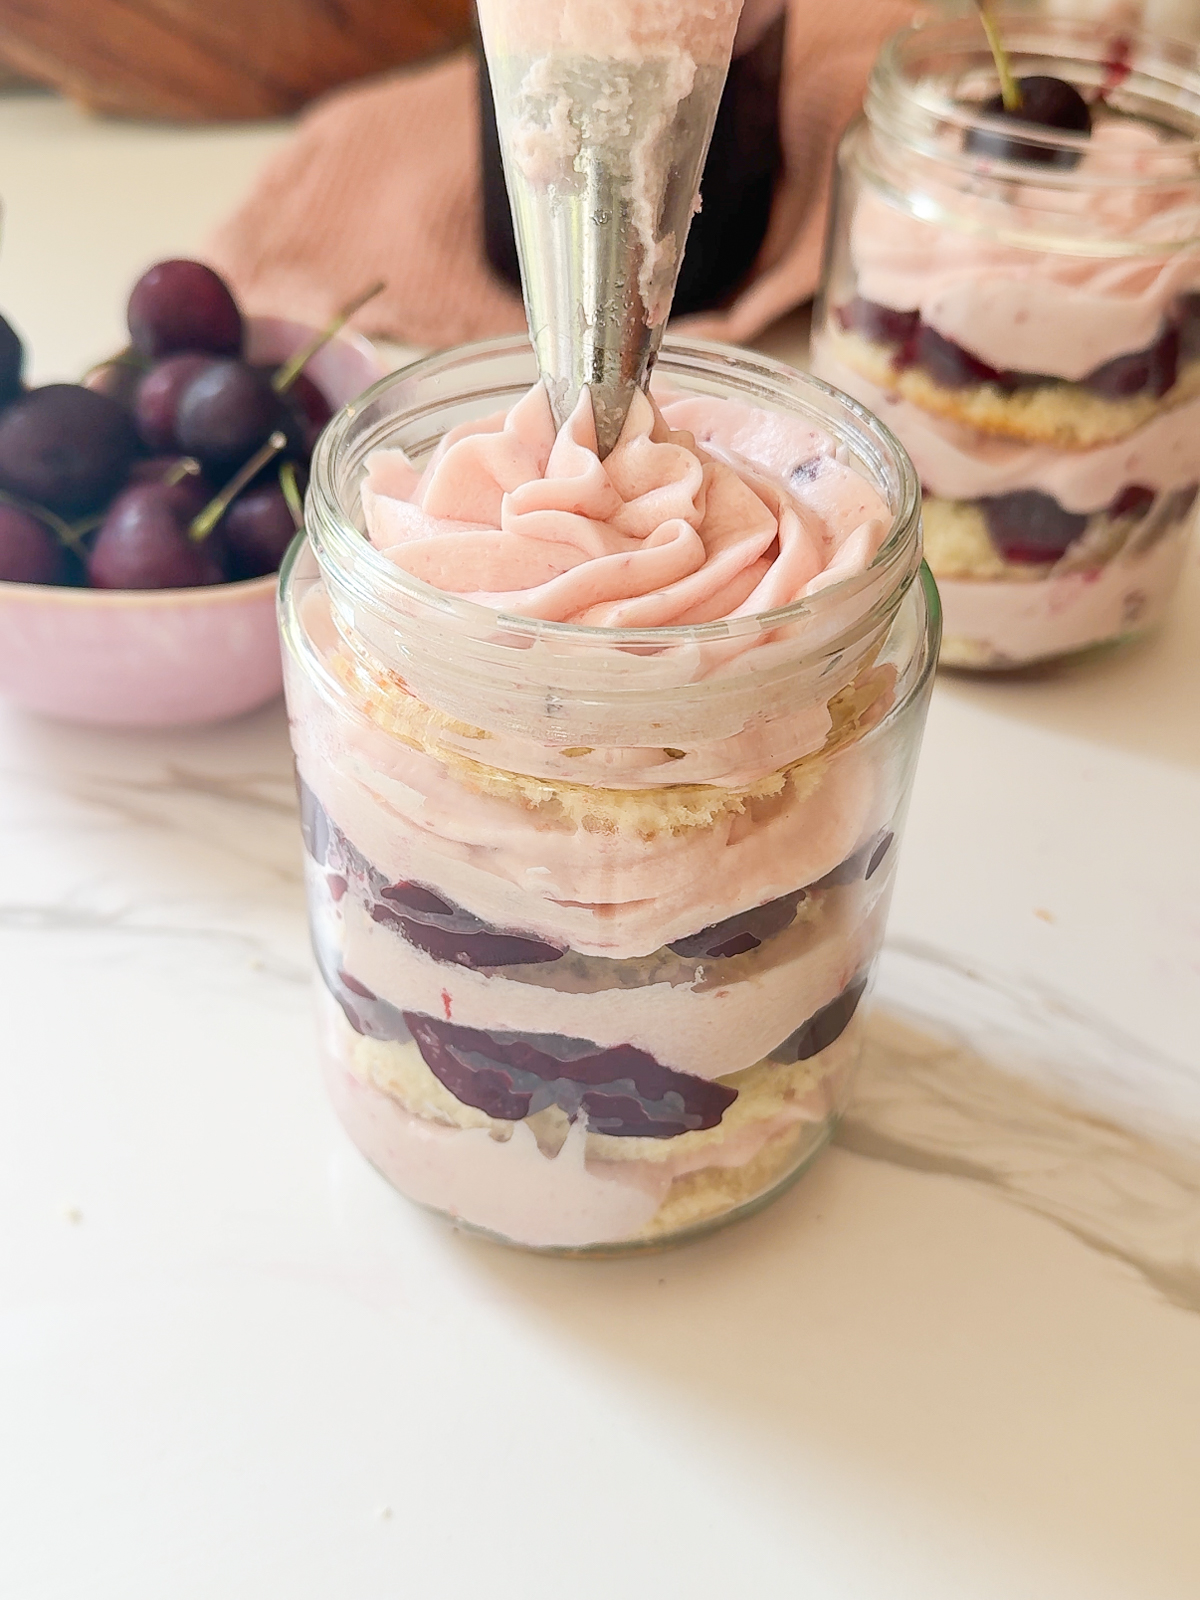
There’s something SO cute about a dessert in a jar. Not only are they adorable and portable, but they also make for a super cute look that is something a little different from your usual layered cake. Among all the jarred desserts out there, cake jars are the perfect combination of flavor, texture, and aesthetic vibes. This recipe features moist vanilla cake, fluffy cherry frosting, and a drizzle of cherry syrup between each tier.
The Magic of Layering
A cake jar is essentially a layered dessert where each component is neatly stacked inside a small glass jar. When done well, the layers are as beautiful as they are delicious. The contrast between the pale vanilla cake, the blush pink of cherry frosting, and the glossy crimson of cherry syrup makes this combination particularly appealing.
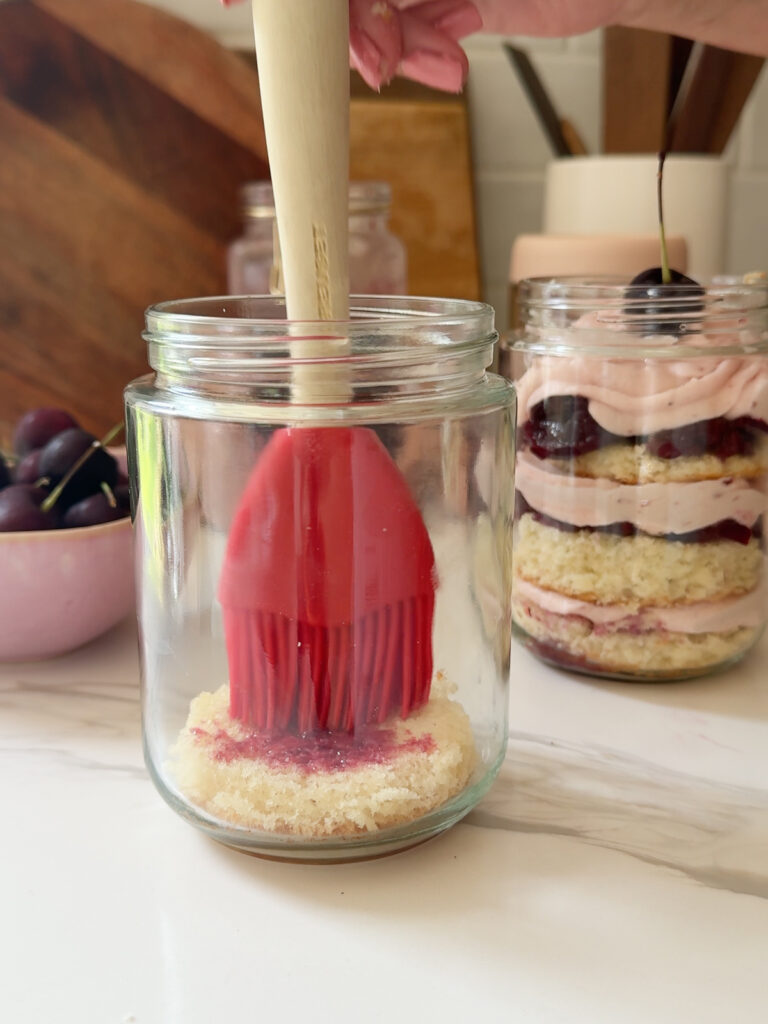
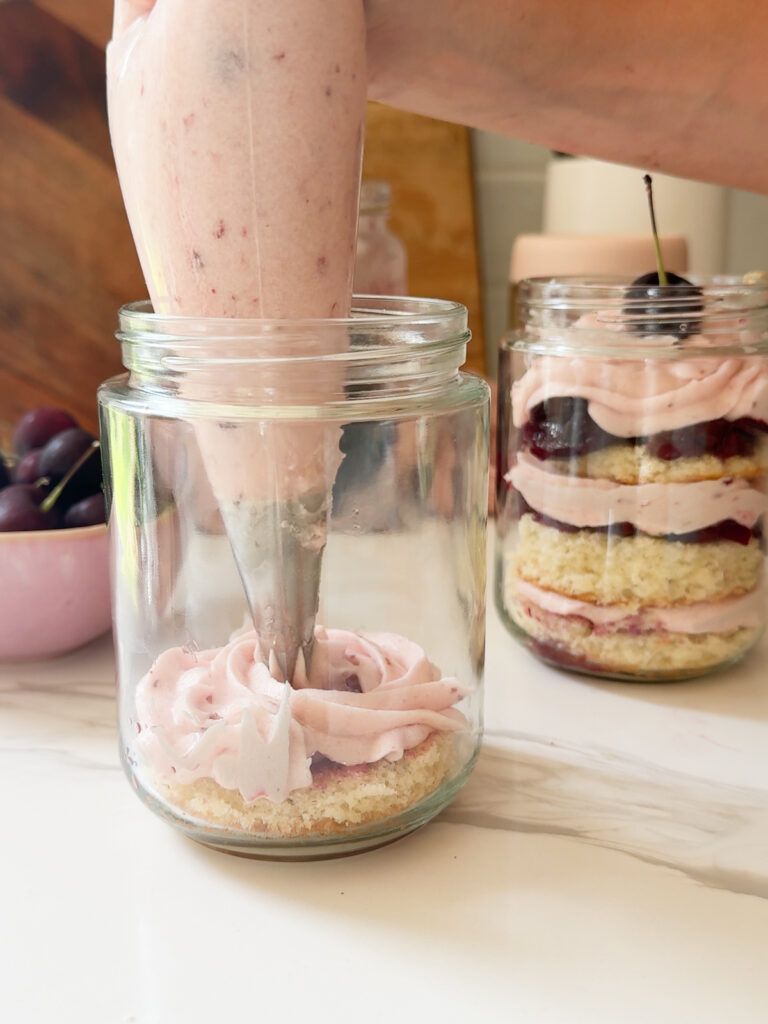
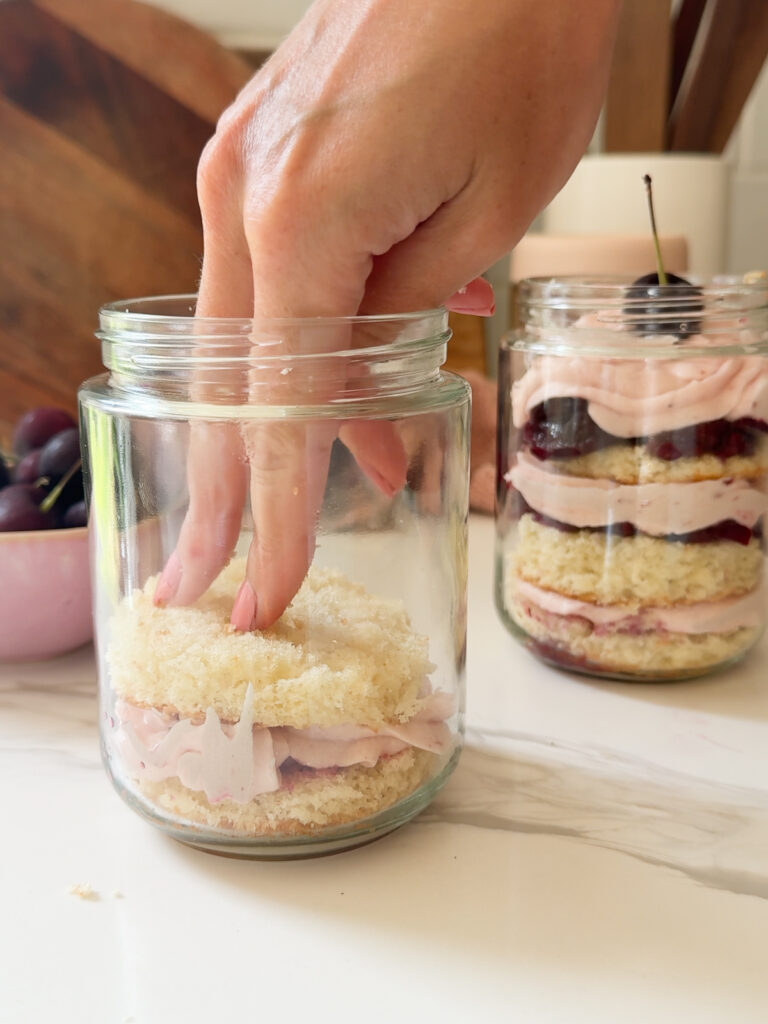
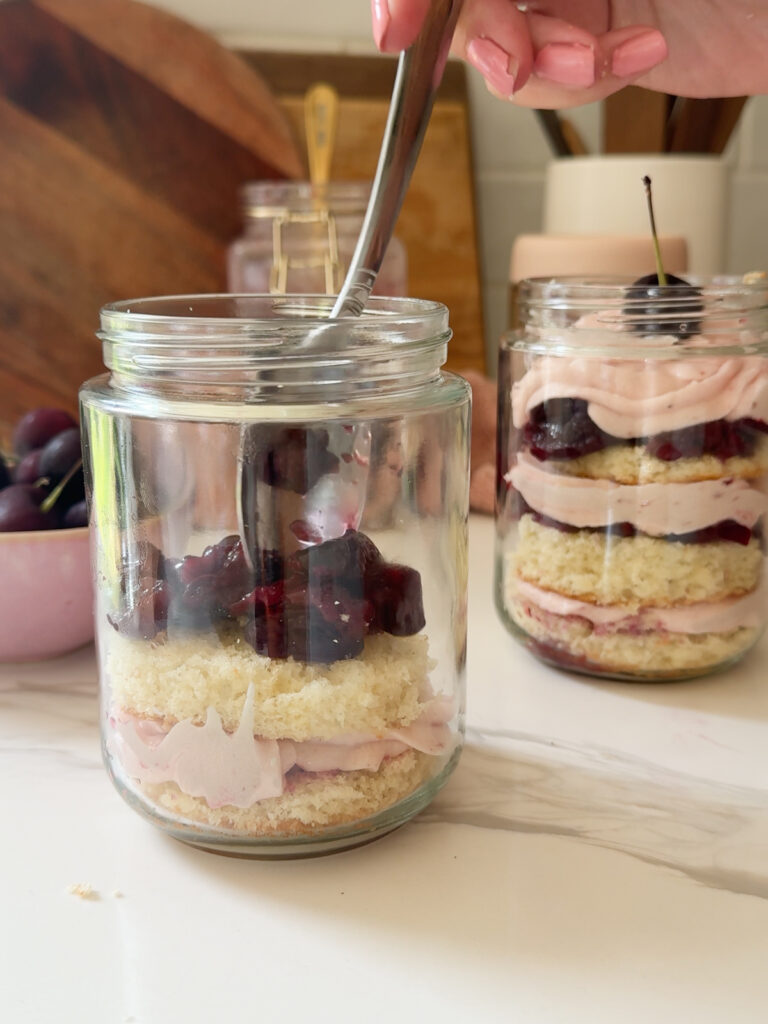
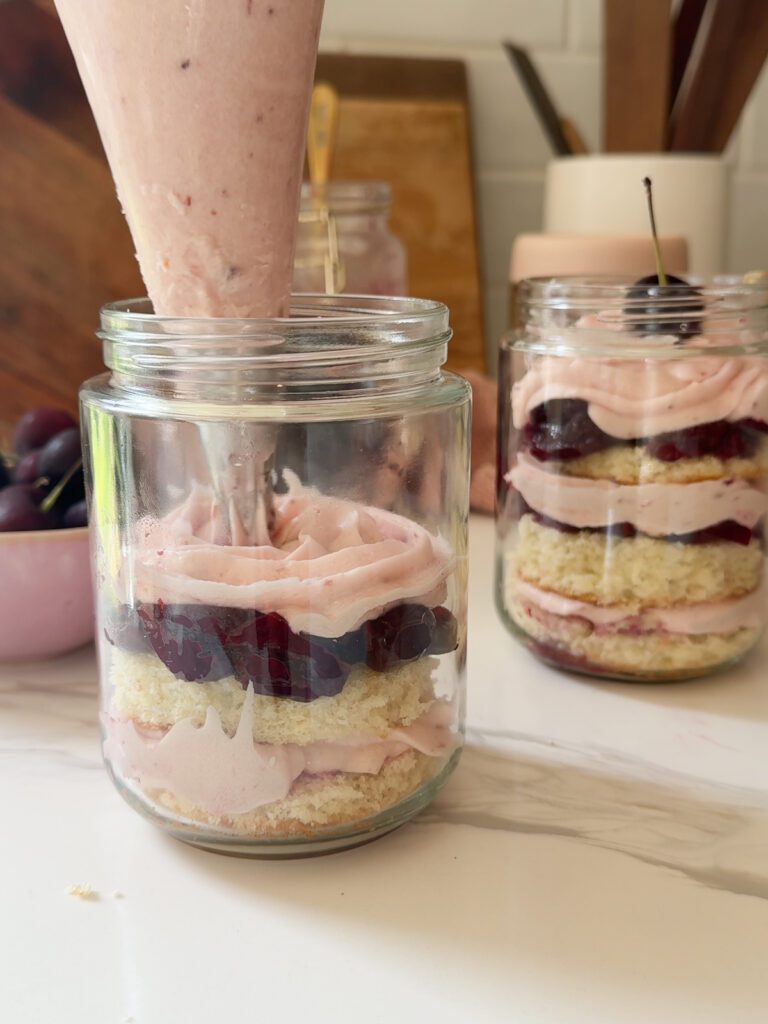
The layering itself is part of the joy. You start with a base of cake, I use a basic vanilla then use a jar to cut out rounds, but you can do whatever makes sense to create layers that fit. Then brush with some of the syrup before piping in a swirl of frosting. Repeat this process until the jar is full, typically ending with a flourish of frosting and a cherry on top. Because each bite includes all three components, every scoop is going to be a winner.
Why Cherry?
Cherry is a flavor that walks the line between tart and sweet. It complements the warm, buttery notes of vanilla cake perfectly. When used in frosting, it brings a fruity freshness that cuts through the richness of buttercream. Cherry syrup, whether homemade or store-bought, adds moisture and a burst of flavor. You can even include whole or halved cherries for texture if you like a little extra texture in your bite.
Summer time screams out for cherries, in my opinion. This is a great way to use up any cherries that are on the end of their life. The syrup especially makes use of older cherries, or if you just have a lot of cherries that you don’t think you’ll manage to eat. You can also use frozen cherries! Just use whatever is easily available to you and best within your means!
The cherries also add a lil pop of visual drama. The syrup seeps slightly into the cake layers, creating a marbled effect, while the pink frosting brings a happy vibrance. If you want to impress guests with something simple but stunning, this is the recipe!

Assembling Your Cherry Frosting Cake Jars
This is super straightforward, and you can use creative freedom to really make these your own.
- Bake the cake: Vanilla is a versatile base. You can bake it in a sheet pan for easy cutting or use cupcake molds.
- Make or buy the frosting: A cherry-flavored buttercream or whipped cream frosting works best. Add a bit of cherry juice or syrup for flavor and color.
- Prepare the cherry syrup: This sounds like a lot of effort, but you just put cherries, water and sugar in a pot and let simmer for 30 minutes. Let it cool before using. For best timing, do this while the cakes are in the oven, then everything can cool at the same time before assembling.
- Layer in the jar: Cake, frosting, syrup, repeat.
Choose jars with wide mouths and use long, but small spoons. This makes layering easier and ensures that people can eat straight from the jar with minimal fuss.
Keeping It Fresh and Make Ahead
One of the advantages of cake jars is their shelf life. When sealed properly, they can stay fresh in the fridge for several days. The syrup helps keep the cake moist, while the airtight environment protects against drying out. If you’re making them ahead for a special occasion, store them in the refrigerator and allow them to come to room temperature before serving.
The Cherry Frosting Cake Jars can be assembled before serving. Or make the cake and syrup a few days ahead – freeze the cake and refrigerate the syrup, then assemble everything when you’re ready!
Ingredients Required
There are no specialist ingredients or equipment required for my Cherry Frosting Cake Jars! Use any jars you have on hand, or pick some up at any large grocery store/online. The cherry syrup adds something super special, so I do recommend making your own, but if you don’t feel like it, just spreading on some cherry preserve/jam will work great too. For the cake, make sure it is fully cool before trying to cut out slices. I like to put it in the refrigerator so it gets more firm, making the slices a little sharper. Here are the ingredients required:
For the Cherry Syrup (which gets used in the buttercream frosting too)
- Cherries, Halved and Pitted
- White Sugar
- Water
For the Vanilla Cake
- Unsalted Butter, Room Temperature
- White Sugar
- Large Eggs
- All Purpose Flour
- Baking Powder
- Milk
- Vanilla Extract
For the Frosting
- Unsalted Butter, Room Temperature
- Powdered Sugar
- Cherry Syrup OR Cherry Jam
Tips for the Prettiest Cherry Frosting Cake Jars
When your dessert is transparent on all sides, presentation matters. Here are a few aesthetic tricks:
- Use a piping bag for the frosting layers. This gives you clean lines and a professional finish. I prefer a swirled tip – 1M works great, but think how you might frost a cupcake. Any piping tip that you think looks good on a cupcake will also look great here. This is obviously optional, so feel free to simply spoon it in!
- Wipe down the inside of the jar if syrup drips where it shouldn’t. Use kitchen paper towels or similar.
- Alternate the height of layers for an organic, artistic look.
- Add a garnish. A whole cherry or chocolate shavings on the top layer adds a touch of elegance.
Common Mistakes When Making Vanilla Cake (And How to Fix Them)
A great cake jar starts with a great cake. Here’s a list of common mistakes people make with vanilla cake, along with easy ways to troubleshoot:
- Mistake: Overmixing the batter
Troubleshoot: Mix just until the ingredients are combined. Overmixing develops gluten, which makes the cake tough. - Mistake: Using cold ingredients
Troubleshoot: Bring your eggs, butter, and milk to room temperature before mixing. This ensures even blending and better texture. - Mistake: Incorrect oven temperature
Troubleshoot: Always preheat the oven and use an oven thermometer if possible. Too hot and the cake domes or burns. Too cool and it won’t rise properly. - Mistake: Opening the oven too early
Troubleshoot: Resist checking the cake until it’s at least 75% through baking. Opening the oven early can cause it to sink. - Mistake: Not measuring flour correctly
Troubleshoot: Use the spoon-and-level method instead of scooping directly from the bag. Too much flour can make the cake dry. - Mistake: Not greasing the pan properly
Troubleshoot: Line with parchment or use a thorough greasing method. A stuck cake leads to crumbling — not ideal for layering. - Mistake: Using old baking powder or baking soda
Troubleshoot: These leavening agents lose strength over time. Replace them every 6 to 12 months for best results.
Perfect for Any Occasion
Cherry cake jars are versatile. They’re casual enough for a picnic, fancy enough for a baby shower, and portioned perfectly for gifts. Add a ribbon and a tag, and you’ve got a beautiful handmade present. For parties, they offer a no-mess alternative to traditional sliced cake. Everyone will love them! I just buy jars from amazon or similar, but if you want to do this on a bigger scale or you’re worried about the glass, use those tall plastic food prep containers.
You can also play with the flavors. Substitute the vanilla cake for chocolate or almond. Use a cream cheese frosting instead of buttercream. Try mixing cherries with raspberries or adding a layer of cookie crumbs for crunch. Once you master the basic structure, the variations are endless.
Let’s Make Cherry Frosting Cake Jars
Creating cherry cake jars is a mix of craft and creativity. It’s not just a cake, but a whole beautiful dessert that will wow anyone who you share it with (or not, that’s up to you)!
Next time you’re craving something sweet or planning a special event, consider the charm and elegance of a cake jar. A spoonful of vanilla cake, cherry frosting, and syrup in perfect harmony — all tucked neatly inside a glass — might just become your new favorite dessert.
For my Cherry Frosting Cake Jars, I use really simple 16-18oz jars with large mouths. I do recommend a good stand mixer or high speed mixer (like this one) to make the cake mixture. If you want more cherry recipes, check out my Cherry Frosted Brownie Cups. For videos and baking inspiration, head on over to my Instagram. If you make this recipe, don’t forget to drop it a star rating, leave a review or share a photo on your socials!
Cherry Frosting Cake Jars
Ingredients
For the Cake (OR use box mix yellow cake)
- 200 g (1 ½ cups) All Purpose Flour
- 200 g (1 cups) White Sugar
- 180 g (13 tbsp) Unsalted Butter Room Temperature
- 3 (3) Large Eggs
- 1 ½ tsp (1.5 tsp) Baking Powder
- 60 ml (4 tbsp) Heavy Cream
- 2 tsp Vanilla Extract
For the Homemade Cherry Syrup (Optional)
- 300 g (3 cups) Fresh Cherries Pitted and Halved
- 100 g (½ cups) Sugar
- 240 ml (1 cups) Water
For the Cherry Buttercream Frosting
- 112 g (½ cups) Unsalted Butter Room Temperature
- 350 g (3 cups) Powdered Sugar
- 3 tbsp (3 tbsp) Cherry Syrup or Cherry Jam
Additional (Optional, for layers)
- Cherry Jam or remaining cherries from syrup
Instructions
For the Cake
- NOTE: While the cake is baking, this gives a good time to make the syrup, if using!
- Preheat the oven to 350℉/180℃ Fan. Grease/Line 2 x 8 inch round cake pans (the cakes will be fairly thin but that's what we want!)
- In a large bowl/bowl of a stand mixer, add all the cake ingredients and combine until smooth. If very stiff, add a little more cream.
- Pour the cake batter into the lined pan. Bake for 23-25 minutes, until a cake tester or knife pushed into the cakes come out clean (just crumbs, no batter). Let cool.
For the Cherry Syrup (if making)
- Pit and slice cherries in half. Add all ingredients to a saucepan and bring to a boil, then reduce the heat to a simmer (low heat) and let cook for 30 minutes.
- Remove from the heat and use a wooden spoon or similar to crush the cherries in the pot, really getting as much juice out as possible!
- Pour the contents of the saucepan into a sieve (sitting above a wide bowl). Then pour the liquid into a jar and the cherries in a separate container. We will use both for the cake jars!
For the Cherry Buttercream Frosting
- Add the butter to a large mixing bowl. Beat with a whisk on high for a minute to soften.
- Add half the powdered sugar, whisk on high. Then add the remaining half with the cherry jam OR cherry syrup and whisk everything on high until fluffy. Add powdered sugar/milk as required to meet your desired consistency.
To Assemble
- Using 16oz jars or similar – whatever you have is fine – cut slices of the cooled cake using the mouth of the jar. Feel free to cut in half to create thinner pieces of cake.
- Layer up: place a layer of cake, then cherry syrup, then the cherry 'jam' (either store bought, or if you made syrup, use the remaining jammy cherries here), then pipe on the buttercream frosting. Repeat until the jars are full!
- Finish by adding a whole cherry with the stem, shaved chocolate or anything else you like!