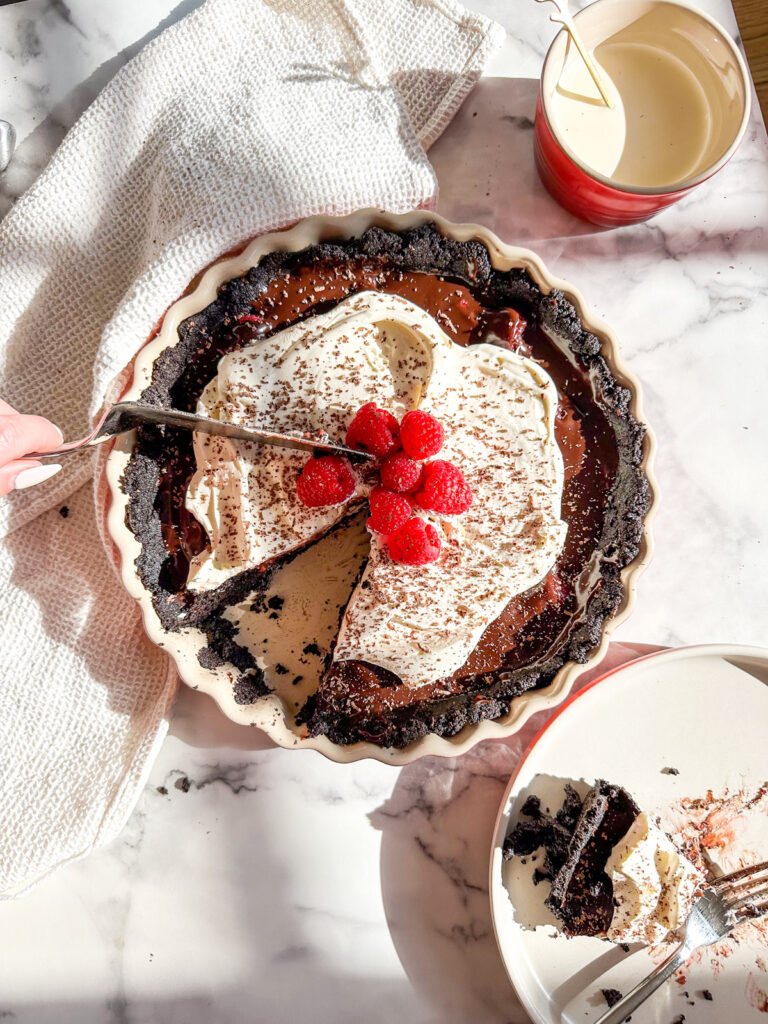
This No-Bake Chocolate Raspberry Tart is made up of an oreo cookie base, chocolate ganache, raspberries and topped with whipped cream. Luscious, creamy and super rich – not only is it delicious, but it looks stunning, and is a wonderful way to end Sunday lunch or a dinner party. The best part, you’ll be stunned how easy it is to pull together!
The tart’s name comes from my fiancé – this tart is, according to him, the best thing I have EVER baked. This is an upgrade from my boyfriend cookies, the thing I made when we first met. This is a real compliment and as such, I cannot stress enough how much I LOVE this recipe.
I absolutely love a no-bake recipe, and this is one that nobody will believe can be made so easily. Essentially, combine crushed Oreos with melted butter and press into a pie dish. Heat up some cream and butter and stir into chocolate for the filling. Add some raspberries and top with whipped cream – and that is it!
Tips for Making a Great No-Bake Chocolate Raspberry Tart (Husband Tart)
A no-bake chocolate raspberry tart is a perfect combination of rich chocolate and tart berries, and it’s relatively easy to make! Here are some tips to help you craft a delicious and beautiful tart:
1. Crust Perfection
- Use Oreos or a similar crisp cookie (digestive biscuits/graham crackers): These provide a nice, sturdy base. If you want something slightly different, you can use almond meal or crushed nuts for a more decadent, grain-free option.
- Butter: Make sure the butter is melted and mixed well with the crushed biscuits. The butter should hold everything together once pressed into the tart pan.
- Press the Crust Firmly: Use the back of a spoon to press the crust mixture evenly into the tart pan, making sure it’s compact and goes up the sides slightly. You can chill it for 10-15 minutes in the fridge to help it firm up before adding the filling.
2. Filling
- Use High-Quality Chocolate: Choose a good-quality dark chocolate (70% cacao is ideal) for the ganache filling. The chocolate will be the star of the tart, so don’t skimp on quality.
- Perfect Ganache:
- For a silky smooth ganache, heat heavy cream until it’s just about to boil, then pour it over chopped chocolate. Let it sit for a minute, then stir until smooth.
- For extra depth, add a tablespoon of butter or a small amount of vanilla extract to the ganache.
- Cool Before Pouring: Let the ganache cool slightly before pouring it into the crust. This prevents it from being too runny.
3. Raspberry Layer
- Fresh Raspberries: Fresh raspberries placed before pouring the ganache not only add a burst of tart flavor but also a lovely visual contrast. Make sure to choose ripe, firm raspberries, as they will hold up better and not release too much liquid. Add some fresh raspberries on top of the cream at the end for a gorgeous finish.
- Raspberry Coulis or Sauce: For a professional touch, drizzle some raspberry coulis or raspberry sauce over the tart before serving. To make a simple coulis, blend fresh or frozen raspberries with a little sugar and strain to remove the seeds.
4. Tart Assembly and Presentation
- Chill Well: Once your tart is assembled, allow it to chill in the refrigerator for at least 3-4 hours or overnight. This helps the ganache set properly and ensures that the tart slices cleanly.
- Garnish with Fresh Mint: A few sprigs of fresh mint or a dusting of powdered sugar can add a beautiful finishing touch.
- Chocolate Shavings or Drizzle: You can make chocolate shavings using a vegetable peeler and sprinkle them on top, or drizzle some melted chocolate over the tart for extra visual appeal.
5. Serving Tips
- Slice with a Warm Knife: For clean slices, dip your knife into hot water and wipe it off before cutting each piece. This prevents the ganache from smearing and gives you a sharp, clean edge.
- Serve with Whipped Cream: A dollop of freshly whipped cream or a scoop of vanilla ice cream complements the richness of the chocolate and the tartness of the raspberries.
Bonus Tip: Make It Ahead
This tart is perfect for making ahead. In fact, the flavors often improve after a day of chilling, so you can prepare it the night before and serve it the next day for an even easier, stress-free dessert experience.
Enjoy making your tart! Let me know if you’d like a more detailed recipe or any other tips.
Ingredients Required
There are no specialist ingredients or equipment required for this bake. I can find everything I need at my local supermarket or grocery store. I use a 9 inch pie dish, but you could use a springform cake pan instead. Make sure to grease the pan well so that the slices come out neatly. You may find popping the pie into the freezer for 30 minutes will also help for a perfect slice!
- Raspberries (Fresh)
- Oreo Cookies
- Unsalted Butter
- Milk Chocolate (Chips or a bar cut up into chunks)
- Semi Sweet/Dark Chocolate (Chips or a bar cut up into chunks)
- Heavy Cream
Tips for the best No-Bake Chocolate Raspberry Tart (Husband Tart)
- Chocolate Ganache Filling: To make this, heat up double (heavy) cream with butter. Keep an eye on this and keep the heat low. It should not come to the boil. Remove when the butter has melted and there are bubbles forming around the edges.
- Chocolate: Using both dark and milk chocolate results in something that is rich and indulgent but not too bitter. Chop it really small for silky smooth ganache.
- Oreo Base: Use any similar cookie you like if you don’t want to use Oreos. The same recipe applies: crush some cookies, add melted butter, press into pan.
- Base: At first glance, it may look like not enough mixture to spread across a 24cm tin. Trust the process. Using your hands is often the best method to ensure a thick enough crust at the edges.
- Topping: I add homemade whipped cream and chocolate shavings for that final flourish.
- Raspberries: I firmly believe raspberries are the best fruit for the combination of dark chocolate and cream. However, similar berries will work. Fresh definitely preferred here but can do frozen if in a pinch!
This No-Bake Chocolate Raspberry Tart is a great bake for so many occasions, with just the right amount of nostalgia to please everyone. For a different no-bake tart, try this Raspberry Pretzel Pie. For videos and baking inspiration, head on over to my Instagram. If you make this recipe, don’t forget to drop it a star rating, leave a review or share a photo on your socials!
Storage and Make Ahead for my No-Bake Chocolate Raspberry Tart (Husband Tart)
SHORT-TERM STORAGE (UP TO 2 DAYS)
- Refrigerate: Cover the tart with plastic wrap or aluminum foil, or place it in an airtight container. This will keep the pie fresh and prevent it from absorbing other odors in the fridge.
- Avoid Moisture: Ensure the tart filling is completely cooled before covering it.
MEDIUM-TERM STORAGE (UP TO 1 WEEK)
- Refrigerate: The tart should remain covered and stored in the refrigerator. This is particularly important if the filling is dairy-based or contains perishable ingredients.
- Keep Tightly Sealed: For best results, use an airtight container to prevent the crust from becoming too soft or stale.
LONG-TERM STORAGE (UP TO 1 MONTH)
- Freeze: If you need to store the tart for a longer period, freezing is a good option. Wrap the pie tightly in plastic wrap or aluminum foil, and then place it in a freezer-safe bag or container.
- Label and Date: Label the container with the date to keep track of how long it has been frozen.
THAWING AND REHEATING
- Thawing: To thaw a frozen tart, transfer it to the refrigerator and let it thaw overnight. This slow thaw helps maintain the texture of the crust.
- Thaw Before Serving: If you’ve just taken the tart out of the freezer or refrigerator, let it come to room temperature or cool slightly before serving to enhance the flavors and textures.
By following these storage tips, you can keep your chocolate tart delicious and enjoyable for as long as possible!

No-Bake Chocolate Raspberry Tart (Husband Tart)
Ingredients
For the Base
- 300 g (2 cups) Oreo Cookies See notes for alternatives
- 100 g (½ cup) Unsalted Butter Melted
For the Filling
- 100 g (¾ cups) Fresh Raspberries
- 200 g (1 cup) Semi-Sweet/Dark Chocolate Chips or Roughly Chopped
- 100 g (½ cups) Milk Chocolate Chips or Roughly Chopped
- 150 ml (⅔ cups) Heavy Cream (Double Cream)
- 75 g (5 tbsp) Unsalted Butter
To Finish
- Raspberries
- Dark Chocolate Shavings
- 150 ml (⅔ cups) Heavy Cream Whipped
Instructions
- First, make the base. Blitz up the Oreos in a food processor or bash with a rolling pin until fine crumbs. Add the melted butter and stir together. Press into a 24cm tart tin (loose bottomed ones are great). Set aside.
- Make the ganache: chop up all the chocolate really small. Put in a large heatproof bowl.
- In a small saucepan, heat the cream and butter on a low heat. Do this until the butter has melted and the cream is beginning to bubble around the edges. Immediately pour over the chocolate and let sit two minutes.
- Stir the ganache/chocolate/cream mixture together with a spatula. It might look odd to begin with but within seconds watch it transform to a glossy chocolate!
- Sprinkle the raspberries over the tart base. Pour over the ganache and spread evenly. Chill in the fridge for an hour (this can now sit overnight or until ready to serve).
- Whip cream using a handheld or manual whisk until soft peaks are forming. Spread over the tart, add extra raspberries and chocolate shavings (do this by simply grating chocolate on a fine cheese grater). Serve!